Rasmus Møller Selsmark

On software test and test automation

Why Spec Explorer generates new states even though no visible changes

clock October 15, 2013 23:45 by author rasmus

This evening I experienced that Microsoft Spec Explorer for no obvious reason treated two identical states as different states in the explored model. Using the “Compare with selected state” feature of the exploration graph viewer in Spec Explorer, I found that the difference was nested deeply inside a .NET generics class:

Spec Explorer model state diff


The example above is from a model testing the Version Control Integration feature of Unity (which might be covered in a later post). If you are reading this blog, you are probably familiar with a version control system, and the problem with the model above is that the Revert() action (S26->S54) doesn’t bring us back to the previous state S13, but rather creates a new state S54. When diffing the states S13 (before checkout) and S54 (after revert), it is seen that the difference is that System.Collections.Generic.Comparer<Int32> has changed from null to an instance of a GenericComparer class.

In the forum thread at http://social.msdn.microsoft.com/Forums/en-US/2e8e999c-9a81-4bb6-814b-1cab8a6c4d93/limiting-state-space?forum=specexplorer covering “Limiting state space”, Nico (Microsoft employee) writes:

Everything in memory is part of the state. The reason is any change to the object model can have consequences on enabled steps

This is the reason why Spec Explorer treats these states differently. In this case the state change was caused by using the LINQ OrderBy() operator in the Revert() action:

Condition.IsTrue(editorId == ModelState.editorInstances.OrderBy(e => e.id).First().id); // limit state space by only first editor can revert

Solution is either to avoid using OrderBy() and other similar operators. Workaround (could be perceived as a “hack”) is to make sure that the Comparer has been set early in the model, by adding the following line to the Filter method of the model:

new Set<int>().OrderBy(i => i);


Spec Explorer Tutorial (for Visual Studio 2012)

clock September 16, 2013 23:17 by author rasmus

A few months back Microsoft released an update to their Spec Explorer tool for developing model based tests, which can be downloaded from the Visual Studio Gallery page. The new version contains several bugfixes as described on http://msdn.microsoft.com/en-us/library/hh781546.aspx, but first and foremost Visual Studio 2012 is now supported and not least this release shows that Spec Explorer is still being actively developed by Microsoft.

This tutorial/getting started guide covers some of the experiences I’ve got from my use of Spec Explorer for some projects over the last couple of years. Primarily this post will focus on

  • Structuring your model project
  • Building models in C# (rather than cord scripts)
  • Limiting model state space
  • Separating model implementation (adapter) from system under test
  • Validating model state using Checker pattern
  • Building and executing tests from model

This tutorial uses Visual Studio 2012, but should be applicable to Visual Studio 2010 as well.

Downloading the files

The files used for this tutorial are available at https://github.com/rasmusselsmark/StackMBT

Modeling a simple stack

For the tutorial, I’ve chosen to model a stack, with the following actions:

  • Push
  • Pop
  • Clear

Probably a lot simpler than the system your'e usually developing/testing, but nevertheless a stack serves as a good example of getting introduced to Spec Explorer, and actually does show some of the challenges related to modeling a software system. And one of my most primary rules when modeling a system is to start simple, which certainly holds true for a stack.

In short a stack is a data type, that only allows to access data at the “top“, e.g. like a pile of books where you are only allowed to take the top-most book.
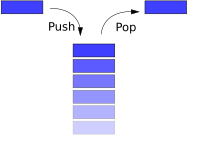
http://upload.wikimedia.org/wikipedia/commons/thumb/2/29/Data_stack.svg/200px-Data_stack.svg.png

Image from http://en.wikipedia.org/wiki/Stack_(abstract_data_type)

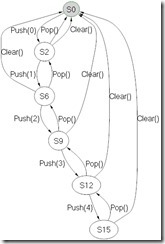
A typical use for the stack in software is the Undo feature, known from almost any program where the user can type in data. The model built during this tutorial will look like this, limited to max 5 elements in the stack.
StackModel

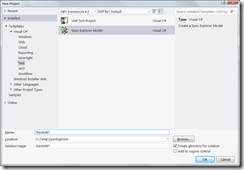
Create new Spec Explorer project

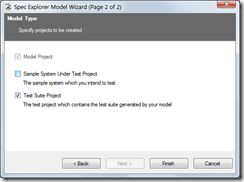
Create a new Spec Explorer project in Visual Studio, by selecting File->New->Project… Select default values, except disable “Sample System Under Test Project” on last page of the project wizard:
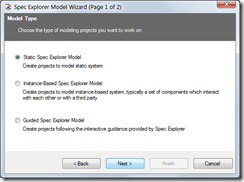
1_CreateProject2_CreateProject3_CreateProject

Structure of modeling solution

For this tutorial (and my modeling projects in general), I use the following project structure. Compared to default naming, you should change “StackMBT” (or whichever name you chose for the solution) to “StackMBT.Models” and also update Default namespace for project as well.

Your solution structure should look like the following:
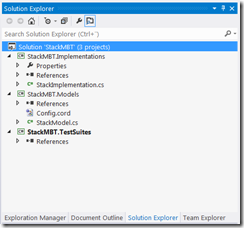
4_Solution

Building the model

In this tutorial, I’m using only C# to define the model, i.e. define actions and transitions. It’s also possible to define transitions using the cord scripting language, but I find that using C# is better for the following reasons:

  • Easier to understand for people not used to using Spec Explorer
  • Possible to unit test your models (will come back to this later in a later blog post)

The Cord script

Update the Config.cord file in StackMBT.Models project to contain the following code:

// A simple stack model using C# model definitions

config Main
{
    // Use all actions from implementation (adapter) class
    action all StackMBT.Implementations.StackImplementation;

    switch StepBound = none;
    switch PathDepthBound = none;
    switch StateBound = 250;

    switch TestClassBase = "vs";
    switch GeneratedTestPath = "..\\StackMBT.TestSuites";
    switch GeneratedTestNamespace = "StackMBT.TestSuites";
    switch TestEnabled = false;
    switch ForExploration = false;
}

// Model for simulating simple stack operations
machine StackModel() : Main where ForExploration = true
{
    construct model program from Main
    where scope = "StackMBT.Models.StackModel"
}

Without going into details on Cord scripts here (see http://msdn.microsoft.com/en-us/library/ee620419.aspx for the MSDN pages on Cord), the two most important elements in the above Cord script are “action all StackMBT.Implementations.StackImplementation;” which says that we should use all actions defined in the C# class StackMBT.Implementations.StackImplementation and the “machine StackModel()” section defines which C# class is used for building the model.

C# model class and state data structure

Add a class with filename StackModel.cs to the StackMBT.Models project. This class will contain the logic for building the model, namely the actions which each describes the conditions required for this action to execute, i.e. for which states the action is applicable.

First, make sure you have

using Microsoft.Modeling;

as part of using statements for the class, as this namespace contains the classes used for describing the model, most importantly the Condition class and the data structures like Sequence<>, which we will use in this tutorial to model a stack.

First of all let’s define the class using

namespace StackMBT.Models
{
    public static class StackModel
    {

Note that the Spec Explorer framework requires you to declare the model class as static. This design choice in Spec Explorer is quite unfortunate I would say, as it makes it e.g. harder to extend models, but in a later blog post, I’ll get back to how we can extend models even with static classes.

Normally you don’t need to declare the model class as public, but I’m doing it in order to be able to unit test the model, i.e. writing tests to verify behavior of the model actions. Writing unit tests for your model class will be covered in a later blog post.

Our model needs to keep track of it’s internal state, for which I implement a specific class (actually a struct). Although the state for this model is quite simple, and we simply could have the stack represented directly in the model class, there are a number of advances related to having it separate, mostly related to reusing state in unit tests as well as implementation (adapter) class.

The StackModelState is declared as follows in the StackMBT.Implementation project (since we’re going to reuse it from our adapter and tests later on):

public struct StackModelState
{
    public Sequence<int> Stack;

    public override string ToString()
    {
        // …
    }
}

Two important things in relation to the state data structure are:

  • StackModelState is implemented as a struct
  • Microsoft.Modeling.Sequence<> is used for representing stack, rather than using the built-in System.Collections.Generic.Stack<> class

When exploring outcome for a model, Spec Explorer needs to determine which states in the model are equal (otherwise the exploration would generate a tree). Based on the page Using Structs, CompoundValues, and Classes on MSDN I’ve found it easiest to use immutable collections as well as structs for representing model state. Spec Explorer provides the following immutable set/collections, which can be used when developing models:

Spec Explorer set Description Corresponding .NET class
Microsoft.Modeling.Map<> Unordered collection mapping keys to elements System.Collections.Generic.Dictionary<>
Microsoft.Modeling.Sequence<> Ordered collection of elements System.Collections.Generic.List<>
Microsoft.Modeling.Set<> Unordered collection of elements without repetitions Probably a custom implementation of List<> gets closest


In the model class, we instantiate the model state in the following field:

// Model state
public static StackModelState ModelState = new StackModelState() {Stack = new Sequence<int>()};

Unfortunately a downside here is that we have to remember to initialize the internal state fields as well, as we cannot rely on a constructor for our struct.

Now that we have the model state declared, we’re ready to move on to defining an action, for which Pop() is the simplest, as it simply has to throw away the first element on the stack (we don’t care about the value of the element right now).

[Rule]
public static void Pop()
{
    Condition.IsTrue(ModelState.Stack.Count > 0);
    ModelState.Stack = ModelState.Stack.RemoveAt(0);
}

Note the Rule attribute applied to the method, which tells Spec Explorer that this is an action/transition. The condition says that we can only pop elements from the stack, if it’s non-empty. Since the Sequence<> type used for representing the stack is immutable, we need to assign it to the stack in the second line of the Pop() method above. If we didn’t assign it, the state simply wouldn’t change.

Now we can also implement the two remaining actions:

[Rule]
public static void Push([Domain("PushValue")] int x)
{
    ModelState.Stack = ModelState.Stack.Insert(0, x);
}

[Rule]
public static void Clear()
{
    Condition.IsTrue(ModelState.Stack.Count > 0);

    while (ModelState.Stack.Count > 0)
    {
        ModelState.Stack = ModelState.Stack.RemoveAt(0);
    }
}

For the Push() action we have declared a parameter, which defines which value is pushed onto the stack. By using a the Domain attribute here, we can declare a method which defines possible values for the argument:

public static IEnumerable<int> PushValue()
{
    return new int[] { ModelState.Stack.Count };   
}

This simply means that we will push the numbers [0,1,2,3,…] onto the stack in that order. If returning a set of multiple numbers, Spec Explorer could pick any one of this numbers during exploration of the model.

Limiting state space

In the actions above, only Pop and Clear methods have set a condition, that these actions should only execute when the stack is non-empty, otherwise these operations aren't applicable. We need to set an "upper limit" as well for in order to control the resulting modeling space when exploring the model. This can be achieved by implementing a method decorated with the StateFilter attribute, which tells spec explorer that this method is used to "filter" the model.

[StateFilter]
static bool Filter()
{
    return (ModelState.Stack.Count <= 5);
}

This will stop exploration of the model, when we reach 5 elements in the stack.

Connecting the model to our system under test using implementation class (adapter)

Before we are able to actually able to visualize/explore our model, we need to implement the adapter, as shown in the following figure taken from http://blogs.msdn.com/b/specexplorer/archive/2009/11/23/connecting-your-tests-to-an-implementation.aspx:
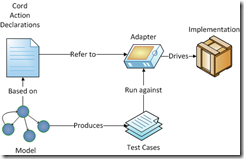
image_4

In the Config.cord file we specified that actions are defined in the class StackMBT.Implementations.StackImplementation:

action all StackMBT.Implementations.StackImplementation;

The full content of this file is as follows:

using System;
using System.Collections.Generic;
using System.Text;

namespace StackMBT.Implementations
{
    public static class StackImplementation
    {
        // Our "System under test" stack
        private static Stack<int> stack = new Stack<int>();

        public static void Push(int x)
        {
            stack.Push(x);
        }

        public static void Pop()
        {
            stack.Pop();
        }

        public static void Clear()
        {
            stack.Clear();
        }
    }
}

In this case we’re actually using the System.Collections.Generic.Stack<> class, as this is the system under test for our model.

Visualizing the model

We have now implemented all necessary parts in order to visualize/explore the model. Open the “Exploration Manager” tab (or select Spec Explorer->Exploration Manager menu), right click and select "Explore":

ExploreModel_1

This should produce the following visualization of our model space:
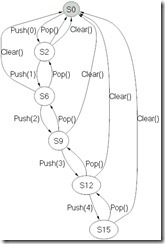
StackModel

By exploring the model using Spec Explorer, we can visually verify that we have modeled the SUT correctly, i.e. not having invalid transitions in the model. For this simple model, it’s easy to verify, but models can quickly become too big to be verified visually. In these cases it’s important to start simple, and verify that the basic model is as expected, before adding new actions.

When clicking on the states in the model/graph, you can use the State Browser window to verify that the model state is as expected when navigating through the model.

image

In the above example, I have selected the S9 state in the model, for which the stack should contain the elements [2,1,0]

Comparing model states

Another powerful feature of Spec Explorer is the ability to visually compare states in the model. Click on e.g. state S6, to select it, and then afterwards right-click on S9 and the select menu item "Compare with selected state":
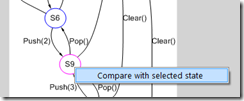
CompareStates_1

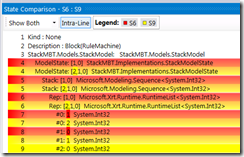
This will then show a visual diff between states S6 and S9.
image

In this case we can see that an extra element #2 has been added to state S9.

Verifying model state using the Checker pattern

Before generating tests based on the model, we need to implement validation of expected model state, by using the State Checker Pattern. This adds an extra action for each state in the model, where we can verify that the state of system under test is as expected from our model, i.e. our stack contains the expected element.

To implement the Checker pattern, add the following rule to StackModel.cs class:

[Rule]
static void Checker(StackModelState state)
{
    Condition.IsTrue(state.Equals(ModelState));
}

as well as the following two metods in StackImplementation.cs:

public static void Checker(StackModelState state)
{
    Assert.AreEqual(state.Stack.Count, stack.Count, "Not same number of elements in stack");

    string expected = ArrayToString(state.Stack.ToArray());
    string actual = ArrayToString(stack.ToArray());

    Assert.AreEqual(expected, actual, "Array elements not equal");
}

private static string ArrayToString<T>(T[] array)
{
    var text = new StringBuilder();
    text.Append("[");

    for (int i = 0; i < array.Length; i++)
    {
        if (i != 0)
            text.Append(",");

        text.Append(array[i].ToString());
    }
    text.Append("]");

    return text.ToString();
}

When exploring model now, you should get the following visualization, where we have the new Checker action applied to each state, showing what the expected state of the stack is at the given node in the graph:
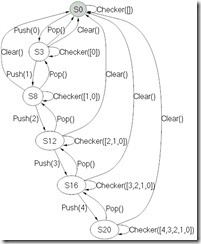
StackModelWithChecker

Generate and execute test cases

One of the strengths of modeling tests, is the ability to have the tool, in this case Spec Explorer, generate test cases based on the model. To do this we simply add the following declaration to the Cord.config file:

machine StackTestSuite() : Main where ForExploration = true, TestEnabled = true
{
    construct test cases
    where strategy = "ShortTests"
    for StackModel()
}

What’s important here is “TestEnabled = true”, which tells SpecExplorer that this machine allows tests to be generated from it using the “ShortTests” strategy for generating tests. Either “ShortTests” or “LongTests” strategies are possible as described on http://msdn.microsoft.com/en-us/library/ee620427.aspx.

In the Exploration Manager window, the new machine “StackTestSuite” is now available.
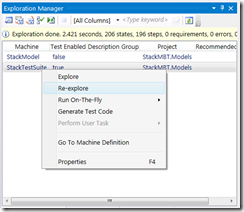
ExploreModel_2

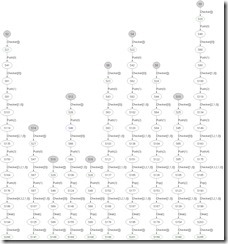
Click “Explore” to see the test cases that Spec Explorer will generate for our model:
TestCasesVisualization

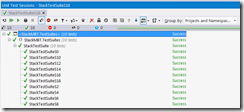
Finally generate the actual C# tests, by choosing “Generate Test Code” in Exploration Manager, which can then be executed as any regular test from Visual Studio (here using ReSharper):
image

By writing relatively little code, we were able to generate a model and 10 test-cases for our system, which is one of the strengths of model based testing. Also, if implementing a new action in the model, it's easy to generate new test-cases using the tool, without having to edit each test case.

This completes this Spec Explorer tutorial. In later posts I will follow up with some more practical examples of using Spec Explorer and model based testing for various parts of the Unity 3D game engine.

EDIT: As I've moved to a developer role within Unity, I unfortunately haven't had time to follow up on with the promised additional posts. My plan is still to use model based testing for testing the features we're working on (mostly back-end).


A high level view on test automation architecture

clock April 15, 2013 22:47 by author rasmus

As I often find myself drawing this overview of a test automation architecture, I’ve finally decided to write a short blog post about it. The architecture itself isn’t either new or very innovative, but nevertheless I find that it still is very useful, and provides a baseline for more recent implementations of test automation, like e.g. SpecFlow or similar technologies.

The purpose of having an architecture for your test automation code is to:

  • Ensure good development practices is used in automation code (remember, your automation code must have same quality as production code)
  • Increase maintainability of test automation code

The architecture diagram is shown below, with a traditional architecture for production code shown on the right (I'll get back to the purpose of this).

image

Test Cases

  • Implementation of e.g. test cases or other
  • This layer should be implemented using declarative programming style, meaning what should be accomplished and not how it’s actual done. I.e. should not include references to actual implementation of system under test, e.g. UI buttons or other more low-level ways of accessing the system

Test Actions

  • Contains all the “building blocks” used in the actual tests.
  • Also somewhat declarative, depending on system and complexity.

Test Infrastructure

  • Imperative (i.e. the actual implementation / "how")
  • The actual ways the system under test is accessed
  • Type-safe representation of UI, e.g. using Microsoft CodedUI UIMaps or similar methods
  • Protocols, e.g. HTTP or other low-level ways of accessing the system
  • Whenever possible, auto-generate code in this layer, e.g. if it’s possible to generate the UIMaps as part of your build process, so you don’t have to maintain these manually.
  • Depending on system, the infrastructure layer exposes either the actual implementations (e.g. UIMaps) or wrapped interfaces, e.g. if there is a need to change actual 3rd party technologies used.

System Under Test

  • No code goes into this layer, but is included in order to show what it is we’re testing (and I find it similar to the database layer in the right hand side of the diagram)

The right hand side of the diagram is included to show test automation code compares to any other traditional software architecture, again in order to emphasize that automation code should be treated as any other code in your system, by using same software development practices that is used for the production code. Another point though is that we should be aware of the added amount of code for automation capabilities. In a typical setup we can easily double the number of layers (e.g. adding 3 layers of automation code on top of 3 layers of production code). The point is of course not to avoid automation, but to have the right level of automation by accessing lower levels of the system whenever possible. And also see if you can auto-generate any of the test automation code like UIMaps or other interfaces for accessing the system under test. If possible generate this as part of your build process.


Microsoft Debug Diagnostic Tool to the rescue!

clock February 28, 2013 00:04 by author rasmus

While testing software, it now and then happens that the system you’re testing simply crashes, without leaving any useful information about what and why. In these cases I’ve found the Debug Diagnostic Tool from Microsoft very useful, as this can provide you with detailed information which can help to locate the bug.

Steps to install tool on your test environment:

1. Download from http://www.microsoft.com/en-us/download/details.aspx?id=26798

2. Configure what kind of crashes to detect (in this case the explorer.exe process):

image

image

image

image


3. Open Tools->Options and Settings… and add your symbols path (in this case I’ve just copied them into “C:\Symbols”):

image

A note here: Make sure you have the same configuration (release/debug) and bitness (32/64 bit) as the binary you want to get stack trace for. Otherwise you won’t get the full details.


4. Trigger the crash and analyze the data to generate a report. In this you will have a stack trace like e.g.

image

as well as line numbers (if you have symbols loaded) to the right:

image


Use this tool whenever you experience a crash in your Windows binaries, for which you cannot get other useful information.


Book review: Lean from the Trenches - Managing Large-Scale Projects with Kanban

clock January 4, 2013 07:33 by author rasmus

Last time I read a “The Pragmatic Programmer” series book was “Ship It!: A Practical Guide to Successful Software Projects” some years back, which I remember as being a well-written practical oriented book on developing software. I spent some time in the Christmas holiday reading “Lean from the Trenches: Managing Large-Scale Projects with Kanban” which is also a short, extremely well-written but still comprehensive book describing the authors experiences from building a nation-wide software system for the Swedish police.

Being a tester, I especially found the sections on how they did test and quality assurance on the project interesting. Along with my earlier experiences, this book confirms me that test is becoming an integrated part of software development, and that the role of the tester in future is moving towards more quality assurance, rather than primarily having a focus on executing tests. I still believe there is a future for execution of exploratory tests in future, but scripted tests seems in many cases to be best handled by the developers, even functional tests.

Minimum Viable Product or “How to slice the elephant”

The book starts out on page 6 by describing how they divided the system into small deliverables, in this case

  • Start by deploying the system to one small region
  • First version only supports a small amount of case types, rest is handled the old way
  • Having the customer in-house

A few simple rules, but as the rest of the book shows, they play a very important role in order to ensure a successful project.

Cause-Effect Diagrams

First part of the book describes the project and processes on a more overall level, whereas the last third of the book goes into more details on the techniques used by the team. One of the chapters in this section contains an introduction on getting started with Cause-Effect Diagrams/Analysis, for which the book describes the following basic process (page 134):

1. Select a problem – anything that’s bothering you – and write it down
2. Trace “upward” to figure out the business consequences , the “visible damage” that your problem is causing
3. Trace “downward” to find the root cause (or causes)
4. Identify and highlight vicious cycles (circular paths)
5. Iterate these steps a few times to refine and clarify your diagram
6. Decide which root causes to address and how (that is, which countermeasures to implement)

One of the examples from the book is “Defects Released to Production” from which the problem “Angry Customers” is identified as well as “Lack of Tools and Training in Test Automation” as a root Cause, as shown in the following example:

clip_image001

Taken from page 139 although the diagram in the book is more comprehensive, e.g. by identifying multiple root causes. In relation to Cause-Effect Analysis, the book says on page 52 that

“Bugs in your product are a symptom of bugs in your process

Which is another way to phrase the well-known statement that you cannot test quality into a product, but needs to be an integrated part of the software development process.

From a testing perspective, this book contains a lot of useful information, e.g. chapter 9 “Handling Bugs” visualizes how “continuous testing” helps minimizing the total time spent on testing and bug-fixing, by having bugs fixed as early as possible. It’s been a long time since I’ve met a team only doing test at the end of a release cycle, but still the following figures shows how we can benefit from having “continuous testing”, in order to reduce total cost of developing software.

Traditional waterfall approach:

clip_image002

Using continuous testing:

clip_image003

Even though we spend more time on testing, it pays off by lowering the time spent on bugfixing:

clip_image004

Limit to 30 active bugs

Another interesting idea from this chapter is to set a WIP (Work in Progress) limit on 30 bugs. Bugs that don’t make it into the top-30, are automatically marked as “deferred” immediately and won’t be fixed. If a bug is found important, one of the existing 30 bugs is removed from the list. This is an effective way of limiting the number of bugs, which I think also helps on keeping focus on fixing bugs immediately (even without necessarily reporting them), since you don’t have the option of just piling the bug along the existing probably several hundreds of existing reported bugs. You easily get “bug-blind” when you have reported more than 50-100 bugs in your system, and setting a hard limit to e.g. 30 seems to be a good way to mitigate this issue.

Reducing the test automation backlog

Chapter 18 is dedicated to describing how to handle lack of test automation for a legacy product, where the advice is to have the whole team increase the test automation a little each team. It’s important to notice that it should be the whole team, and not e.g. a separate team, as the whole team should learn and be responsible for writing tests. For identifying which test cases to automate first, the book prioritizes the tests by

  • How risky the test case is, i.e. will it keep you awake if this test is not executed?
  • Cost of executing test manually
  • Cost of automating test case

Beside what I’ve described in this review, the book also contains valuable tips on how to organize your scrum boards, standups etc.

In short this is a really good book, which is furthermore quickly read, so I will recommend it to everyone participating in software development projects.


GOTO Aarhus 2012 - Day 2: What, no testers?!

clock October 2, 2012 22:35 by author rasmus

The good thing, for me as a tester, by attending a developer conference like GOTO, is that I get a different perspective on my profession, which I probably wouldn’t have gotten by attending a usual test conference. Today I saw a couple of sessions on Continuous Deployment, most remarkably a presentation by http://www.etsy.com/ in which it was shown how they do 30 deployments to production daily.

A common anti-pattern in relation to deployment, is the concept of a “deployment army” as presented by Michael T. Nygard in his presentation, where as a result of having few deployments, each release is so large that you need an “army” of people to deploy it. This gives a high cost on deployment, so you cannot afford to increase the number of deployments, and the result is a kind of dead-locked situation that you need to get out of. Continuous Deployment may solve this, as soon as you have accepted that you have a problem.

The benefits of doing Continuous Deployment is that the software development team gets almost immediate feedback on deployed changes, without having to wait for some time before releasing into production. Below is an example from Etsy, where they after a release noticed an increase in the number of warnings (the vertical red line at approx. 16:05). Within 10-15 minutes they reacted to the situation and was able to release a new version which fixed most of it, and 30 minutes after the incident, the issue was solved completely. Of course we want to avoid such issues, but when they happen, it’s important that the organization can react fast. So the benefits are basically that we get really fast and relevant feedback to changes to code. I’ll get back to what implications this has to an organization.

As stated by several speakers today, this of course requires the architecture to be prepared for this way of deployment, especially not having one big monolithic system, but being able to deploy individual components of the system. For the people being skeptical to how Continuous Deployment can actually work, Jez Humble mentioned in his presentation that when Flickr was acquired by Yahoo in 2005, they compared Flickr (which were deploying continuously to production) against all other Yahoo services, and it turned out that Flickr had the highest uptime. So Continuous Deployment certainly can work for high uptime sites, and after hearing the presentations today, it is certainly the case.

But lets take a look at a deployment process in general:


(NFR Test: Non-functional requirements testing)

This looks very much similar to a deployment cycle that I’m used to, although having some of the steps being manual or partly manual in my situation. In Continuous Deployment this must be performed several times per day, which leaves very limited time (actually none) for any manual task involved. So moving towards Continuous Deployment means that all of the processes, including test, must be automated. As it’s the developers that are monitoring the production site (performance, errors etc.) there are even no dedicated system operators involved. The DevOps (developer/operations) role is a part of the individual development team.

To follow up on the title of this blog post, I got a couple of minutes to talk with Michael T. Nygard (independent consultant) and Mike Brittain (Etsy), about the role of test automation. The very interesting answer from them was that they don’t have dedicated test automation engineers in Etsy and Michael said that he doesn’t see this role in new organizations, but rather see a role of SRE (software reliability engineer) around occasionally. Amazon is also present at the conference with a booth, which basically seems to be a recruitment campaign among Danish developers. I took a look at their job postings, and it turns out that they have no test automation engineer jobs either. I heard from others that Netflix (a TV/video streaming site) in their presentation also mentioned that they have a very limited number of testers.

Conclusion on state of test automation in the industry

I started out my series of GOTO blog posts at http://rasmus.selsmark.dk/post/2012/08/27/GOTO-Aarhus-2012-Is-it-time-for-developers-to-move-beyond-unit-tests.aspx by asking the question

“Is it common to have automation testers in the industry (like my current job) or is automation a part of usual software development activities?”

After today, I must say that the conclusion is that it’s not common to have dedicated testers (at least not in newer companies) and in order to do Continuous Deployment fully, dedicated testers becomes a bottleneck, and therefore this role does not exists in such an organization. And in the case of Etsy, they even have very few (<5) people doing manual exploratory testing out of a total of 350 employees. So the game is certainly changing for testers, if you move towards more often releases. I don’t feel concerned as such, as I’m sure any good tester has valuable domain knowledge, which can be used elsewhere in the organization, but we should be aware that the world is changing for us.


Levels of Software (Test) Automation

clock September 26, 2012 21:52 by author rasmus

While doing software test automation, I have realized that there is a lot more to automate than just the tests, in order to have test automation run successfully and minimizing maintenance. For testing Captia I see the following layers, which I assume is applicable to other software products as well:

image

The important point here is that there exists a foundation for your test automation, which must work properly in order to have a stable environment for running test automation. For long time I have been focusing on the Tests layer of the above diagram, whereas we have recently in ScanJour worked on the lower parts of the “test automation eco-system”. Especially Jens Tidemann, who started here in the beginning of the year have pushed this a lot, by starting to develop PowerShell scripts for setting up environments and system under test.

This blog post describes our solution for automating the process of setting up test environments in a uniform way across products.

Use Source Control for storing automation scripts and configuration

All topics described in this post can be automated, and is in our case. As any other test automation, treat this as a regular development project, i.e.

  • Plan
  • Store all assets (scripts, tools, configuration files etc.) in source control
  • Write unit tests when possible for the tools
  • Consider backwards compatibility when making changes to the tools. In our case the automation supports different versions of the product, which has been really valuable using it for recreating test environments that was previously setup manually.

As described later, even configurations for setting up customized test environments can be stored in source control.

“Test Environments” layer

This layer contains setting up and configuring test environments, i.e. the machines for executing either manual or automated tests. In our case we’re running virtual machines/environments using Microsoft TFS Lab Management, but this layer could be based on another virtualization technology or physical machines/devices.

For setting up the raw machines, we’re currently implementing Microsoft Deployment Toolkit which automates the deployment of Windows images with/without additional software packages like Microsoft Office etc. that is required by the System Under Test.

Another part of automating this layer is PowerShell scripts that is able to perform the following tasks:

  • Join domain (we’re typically running network isolated environments with own domain controller). This requires user to enter credentials, so this is done as the first step. Rest of the tasks are performed automatically.
  • Install general prerequisites, e.g. .NET, IIS
  • Install latest Windows Updates (with an XML based “exclude” list containing e.g. IE9, which we don’t want installed)

With this approach the effort for deploying an baseline environment has been reduced to something like 10-20 minutes of manual work. It of course still takes several hours to deploy the environment in TFS Lab Management, but most of it is done automatically, and therefore doesn’t require user interaction.

image

After environment has been deployed and above steps performed, a “baseline” snapshot is taken which contains:

  • Windows OS
  • Joined the test domain
  • Configured IIS etc.
  • Windows Updates
  • Microsoft Build Agent in order to do automated deployments from TFS
  • Optionally Microsoft Test Agent if used for automated test execution

Whereas the baseline does not contain:

  • Active directory users
  • Prerequisites for system under test, like database drivers etc.

This way we have environments that can be used for multiple purposes. Be careful what you choose to include in the baseline snapshot, and not to “pollute” it, with components that might lock the environment to only be used for too specific purposes. In our case we’re e.g. not installing Oracle database drivers in the baseline environments, since this would mean that only specific version of Captia can be installed.

“System Under Test” layer (with prerequisites)

With a baseline for the test environments as described above, the product to be tested can be installed on either of the available environments, depending on the the type of test to be performed.

image

E.g. if just performing a visitation or testing some simple functionality, one of the small environments can be selected. Alternatively if testing more complex scenarios, there are a few complex environments available for this purpose.

Prerequisites

A key point here is to be able to automate installation of both the product to be tested, as well as prerequisites for the product. Example of prerequisites that can be installed automatically is:

  • Database drivers
  • Third party dependencies

If a prerequisite either takes a long time to install, or is not easily automated, you might select to install this manually and include it in the baseline snapshot. But this means that the environment is then “locked“ and might not easily be used for  other purposes.

System Under Test

With the prerequisites installed, the actual product to be tested can then be installed. Based on the product there might be different ways to do this. If you have multiple teams working on different products, consider making a common way of installing each product, in order to make it possible for other teams to install integration test environments.

We have solved this by developing PowerShell scripts that reads from a XML file which modules to install. Each team then develops the PowerShell scripts needed for installing their product. Below is an example of XML configuration file used for installing Captia on a test environment:

image

“Test Data” layer

Having installed the product, next step is to apply test data. For this purpose we have developed Test Data Repository, which is able to populate the following types of data:

  • Active Directory users and groups
  • Exchange mailboxes
  • Files
  • Test data in Captia (e.g. cases and documents)

As it can be seen from the conceptual overview below, Test Data Repository both has a UI front-end as well as an API.

image

The UI is used in manual test for populating test data, whereas the API can be used by automated tests for creating prerequisite data for the test and asserting results.

“Customizations” layer

If doing customizations, it’s important that all customizations have similar ways of installing, and are supporting silent install. Many of our customers are having minor or larger customizations, that are installed on top of the standard product.

Automated installation of customizations in test environments are configured in the same XML files used above for installing the standard products. This way the XML configuration file also documents the customers configuration, i.e. version of the standard product and add-ons as well as their specific customization.

image

The XML snippet above shows a customization consisting of two packages.

“Customization Test Data” layer

If the customer has any special test data, this is defined in one or more XML files, which is populated into the system using the Test Data Repository described above. It’s important to handle a customization as a standard software product, i.e. don’t develop anything special for a customer, but focus on using same structure and tools for all customizations, in order to be able to automate deployment and test for the customizations as well.

image

The above XML shows test data for a customization, which is applied after the customer solution has been installed in test.

“Tests” layer

With all this we now have a system, optionally with customization, ready for test. Typically deploying an environment with customization takes 30-40 mins including reverting to snapshot, without any user interaction. A huge step forward compared to manually setting up an environment.

TFS Build Definition

As we’re running TFS, the actual deployment is configured in a build definition

image

When starting a deployment, you specify which lab environment to use:

image

And which machines on the environment to deploy to (in this case only the webserver):

image


Test automation dependencies includes environments, system under test and test data (as well as many other). Ensuring the foundation is in place is a key factor in developing successful test automation, and I hope this post has given some insights on how we have automated deployment and configuration of test environments in ScanJour.


GOTO Aarhus 2012 - Developers *are* writing functional tests :)

clock September 9, 2012 22:33 by author rasmus

Even though this is a part of my “warm-up” blog posts for GOTO Aarhus 2012 Conference, I’ll start out referring to a related event this week. At our latest meeting in the Danish TFS User Group, held at the Microsoft office in Hellerup, Rune Abrahamsson from BRFkredit had a presentation on how they are using http://cuite.codeplex.com/ for developing functional tests for one of their systems. If you are interested, Mads (our agile coach at ScanJour) has also blogged from the user group here.

Although the people attending the TFS Users Group meetings are mostly developers, we often have at least one testing-related topic on the agenda, and this time it was clear that many of the present developers does have experience with developing functional tests, often using a UI automation framework like Microsoft Coded UI. So even before attending the GOTO Aarhus 2012 Conference, it seems I can conclude that developers are writing functional tests, which pleases me, as I think the people writing the software, also are the best at writing automation for it. The testers can then do actual quality assurance, by ensuring that the customer requirements have been automated, as well as performing exploratory testing to exercise the software in new ways.

IMAG0007

Sorry for the bad picture quality; the slide shows at the bottom which areas (including functional UI tests) are covered by developer tests, whereas e.g. exploratory tests are performed by their manual testers (which are actually domain experts, not full-time testers). I find it very positive to see a development team take quality seriously, by including test automation, when they are in a situation where they are lacking testers. I guess this is not an uncommon scenario in the industry, that you have to get test assistance from other teams/departments.

And it makes me wonder if manual testers should be forced to not do manual scripted test at all, but only do exploratory testing and quality assurance, since the developers will fill the gap themselves, by automating the scripted test cases? Smile


To put this in the context of this years GOTO conference, I have been looking at the biographies of some of the speakers, and found a video by Steve Freeman on Sustainable Test-Driven Development, where he touches topics like:

  • Too coupled production and test code, which makes refactoring difficult (beginning of video)
  • Test code structure (similar to Given/When/Then pattern of e.g. SpecFlow)
  • “You come back to the code after 6 months, and forgot why you did this” (approx. 13:00)
  • Patterns for writing test code. As simple as good variable naming, using DSL syntax to have more more readable test code
  • Prepare for your test to fail at some point, simply by having clear error messages when it happens (“Explain yourself”, “Describe yourself” and “Tracer Objects” around 23 mins into the video).
  • Make your tests robust, e.g. “Only Enforce Order When It Matters” (around 40:00)
  • “Tests Are Code Too” (43:35), which is the last slide and also seems to be the headline for this presentation

The last slide is shown here:

image

Although all four bullets here are important, I have myself faced the “If it’s hard to test, that’s a clue” problem, when developing unit tests, both for production code as well as test automation framework code. As an automation tester, I also regularly have the problem when writing automated functional tests against production code, e.g. missing id’s on UI controls, no clear interface for testing etc. When the development team is writing automated functional tests as part of definition of done, it should hopefully result in code better suited for automation. And then the general conclusion, that test automation should be treated like any other code activity.

This year Steve Freeman has a session on Raspberry Pi with extra toppings Monday at 13:20, which unfortunately is a timeslot where I have also some other sessions I would like to see (What is value and Mythbusting Remote Procedure Calls), but it might be that I have to change my mind; as it could also be fun to get an introduction to the Raspberry Pi.

After watching this video, I feel confident that I will meet developers at the GOTO Aarhus 2012 Conference this year with a quality/testing mindset, and I’m looking forward to talk with you about your view on test automation, and how I as an automation tester can bring value and increase the quality of our software products, even if it's no longer a dedicated test automation developer writing the functional tests.

Feel free to comment on this post below.


Code bug vs. Idea bug

clock September 5, 2012 22:43 by author rasmus

In my last post I mentioned “Idea bug”, which I have got a number of questions about. I have taken the term from the GTAC 2011 Opening Keynote – Test is Dead (a good video, by the way). If you go approx 17:00 into the video, the presenter defines it as:

Code bug:
Wrong product behavior


Idea bug:
Wrong product!


Accompanied by this following fantastic illustration:

image

Hope it is clear why we want to avoid idea bugs Smile


GOTO Aarhus 2012 – Is it time for developers to move beyond unit tests?

clock August 27, 2012 12:05 by author rasmus

I’ve been so fortunate to have been invited as official blogger at the GOTO Aarhus 2012 conference this year, which most likely means a number of new readers will be reading this blog post, so I’ll start by giving a short introduction to myself.

10 years ago I shifted from “regular” software development to software testing with a job as SDET (Software Development Engineer in Test) in Microsoft Vedbæk (Denmark), after which a couple of years followed as software developer (but still with focus on test and quality assurance) until I started in my current job as technical lead for test automation in ScanJour two years ago. We run Scrum in teams of 5-8 persons, with usually two domain (manual) testers and one automation tester in each team. The role of the automation tester ranges from automating already defined manual functional test cases to performing load and performance tests.

Now I’ve got the chance to participate in a GOTO conference, which seems to be a true developer conference, by not having “Tester” as an option in the Role field when you register – I registered myself as “Other” Smile

clip_image001


So what’s the state of test automation among developers?

During the last 10-12 years in software development, I’ve seen how unit tests has helped to increase the quality of the products we ship, by often ensuring the most obvious bugs being caught early, but not least ensuring the individual classes/units are actually testable (otherwise it wouldn’t be possible to write unit tests against them).

But I still face problems when trying to write automated tests, due to lack of “testability” of the products in the following areas:

  1. No silent installation/uninstallation, or not officially supported (so if you report bugs, they are closed “by design”)
  2. Missing unique id’s on controls in webpages when doing UI tests, which makes it harder to write test automation and makes test cases less stable
  3. No clear testable layers in the application, which often means you have to resort to doing automation on the UI layer
  4. Test is not done in parallel with development, but sometimes when the developer has started working on a new task or even in a later sprint (unfortunately)

#4 is not only a developer-issue, but still a problem for the team, because it means that you risk finishing/shipping code, which either contains bugs or you find out is not testable.

Inspired by ISTQB (a certification for testers), I see the following levels of software tests (simplified, there also exists load test etc.), with unit tests being closest to the code and of course automated, and release acceptance testing often (but not necessarily) being a manual testing activity.

clip_image002

I highly value that testing should be independent from development (even if part of same Scrum team), simply to get another pair of eyes to look at the system; I’ve seen many “idea-bugs” (not understanding customer needs correctly) being caught early by domain testers, that could otherwise have easily slipped all the way to the customer (where the cost of fixing it is higher).

Regarding the issues I raise above concerning lack of testability, I think many of these could be solved by having the software developers developing more automated functional testing, in the same way that unit tests ensures some degree of testability of units/classes. After all it’s in the interest of the whole team to deliver working software to the customers, as effectively as possible.

So the questions I’ll try to get answers to while being at GOTO Aarhus 2012 conference are:

  • What’s the state of automated functional test at all?
  • Are software developers already automating non-unit tests like e.g. functional UI tests?
  • Is it common to have automation testers in the industry (like my current job), is automation a part of usual software development activities or have you actually been able to successfully do capture/replay test automation maintained by domain/manual tester? (I would be surprised if the latter is case)

You are certainly already now welcome to give me input to these topics, by leaving a comment below, thanks.

PS. If you are interested in what GOTO conference sessions a tester finds interesting, you can see my schedule here.


About the author

Team lead at Unity Technologies. Focus on automating any task possible. Author of e.g. http://uimaptoolbox.codeplex.com

Twitter: @RasmusSelsmark

Month List

Sign In