Rasmus Møller Selsmark

On software test and test automation

Configuring ASP.NET web server for Unity WebGL content

clock November 21, 2015 13:12 by author rasmus

When publishing Unity 5.x WebGL content on a ASP.NET web server, you will see following error when opening your game in a browser, if your webserver hasn't been configured correctly:

An error occured running the Unity content on this page. See your browser's JavaScript console for more info. The error was:
uncaught exception: incorrect header check

This is caused by server returning HTTP 403 error messages on the file extensions used by Unity WebGL. Create or update Web.config file in root of your website to contain following entries:

<configuration>
	<system.webServer>
		<staticContent>
			<!-- Unity 5.x -->
			<mimeMap fileExtension=".data" mimeType="application/binary" />
			<mimeMap fileExtension=".mem" mimeType="application/binary" />

			<!-- Unity 5.3 -->
			<mimeMap fileExtension=".datagz" mimeType="application/binary" />
			<mimeMap fileExtension=".jsgz" mimeType="application/binary" />
			<mimeMap fileExtension=".memgz" mimeType="application/binary" />
		</staticContent>
	</system.webServer>
</configuration>


Characteristics of good (unit) tests

clock October 28, 2014 23:15 by author rasmus

Together with our great team of test framework and automation developers at Unity, I spent last week on Test Driven Development (TDD) training with Roy Osherove, speaker at several conferences plus e.g. author of the book The Art Of Unit Testing. This post serves primarily as my personal notes from the training, although I of course hope others find it useful as well.

The topic of this post is defining properties/characteristics of good unit tests, however first we need to get an understanding of what a "unit" is.

Output from a unit (of work)

Roy defines a unit, i.e. the subject being tested by a unit test, as a "unit of work", rather than just a method or class. A unit of work accepts input/gets invoked, and has as output:

  • Return value / exception
  • Noticeable system state change
  • 3rd party call

For 3rd party calls, we implement fakes (mocks) which can help us verify that the expected calls actually were executed.

Test public API

Private members are always called in a context, which is important to include when testing our code from a unit test. If you have private methods containing functionality you would like to test separately, you can make them internal and test them using [InternalsVisibleTo] attribute in C#. However it makes sense to me, primarily focusing on testing the public API, since this first of all gives a well-defined layer of separation for what should be tested.

In relation to this, consider the database as "private" to the implementation, and therefore should not be tested explicitly. Including validation of values in the database, means that your tests suddenly spans multiple layers, which at some point will decrease maintainability of your tests, and most likely also violates e.g. http://en.wikipedia.org/wiki/Single_responsibility_principle. Any software development principle and guidelines for production code also holds true for test code. As mentioned earlier, your test code should have the same (hopefully) high quality as your production code, otherwise you won't trust your tests (more on this later).

Unit vs. Integration tests

In a unit test, you need to have control over all parts of the system under test. If not, it's an integration test.

Writing unit tests is an investment up front

For me, the primary reason for writing unit tests, is that it's an investment you make up front, to ensure a maintainable product of high quality on the longer run. As Roy added, "you never get/have time to write tests later in a project", so simply just do it right from the beginning. Roy presented one study of two teams working on similar project in same company, and while the TDD team released their feature a few days later than the non-TDD team (in a project of approx. one "team-month), they won on the long run by having 90% fewer bugs in their feature, resulting in fewer support-request and bugfixes. Given how TDD encourages teams e.g. to pair up and consider use cases before jumping into development, I can, based on my experience, easily see how they end up with a higher quality feature in the TDD team.

Unit test naming convention and structure

Suggested naming convention for tests: [UnitOfWork_StateUnderTest_ExpectedBehavior], e.g: Add_TwoNumbers_SumsThemUp, see also http://osherove.com/blog/2005/4/3/naming-standards-for-unit-tests.html

Writing readable/maintainable tests using "3A" pattern:

  • Arrange
  • Act (invoking the entry point)
  • Assert

An example of a unit test written this way (from our daily TDD Kata, which we started doing every morning for 30 mins during the week):

[TestCase(3, "1,2")]
[TestCase(6, "1\n2,3")]
public void Add_MultipleNumbers_ReturnsSum(int expected, string input)
{
	// Arrange
	var calc = GetDefaultStringCalculator();

	// Act
	int result = calc.Add(input);

	// Assert
	Assert.AreEqual(expected, result);
}

The comments above are simply included for the purpose of explaining the structure. You shouldn't have boilerplate comments like these in your code ever :)

Also note the use of a factory method above for instantiating the object being tested. This way your test code becomes more maintainable, e.g. if adding a constructor argument at a later point, you only have to add this one place.

Fakes: Mocks vs. stubs

Fake is the generic term for mocks and stubs, and is defined as "something that looks like something else, but isn't". General rule is that you assert against a mock, but only use stubs for providing assumptions for your tests.

If you are asserting against multiple mocks in a test, it's a smell that the test violates single responsibility principle, and is likely a candidate for splitting into separate tests.

Characteristics of good unit tests

While this training specifically was targeting writing unit tests, my personal observations tells me that the properties of good unit tests also is true for any other automated test, including integration and especially UI tests (which from my experience is the most unstable type of tests, why people easily loose faith in the results)

Trustworthy

  • If a test fails randomly people will start ignoring it. As soon as you have one red test, it's easy to let another red test slip in (http://blog.codinghorror.com/the-broken-window-theory)
  • Run tests as part of your automated build process, otherwise people won't write tests
  • Test smell: If a test fails, can you easily say why it fails
  • Start by writing a failing test, which gives you faith that the test will actually fail if the feature is broken at some point
  • Generally "high coverage + reviewed tests = good quality"

Maintainable

  • No logic inside a unit test, e.g. no loops, if statements etc.
  • Only test public APIs
  • Only test one thing per test. E.g. if asserting on multiple objects, you risk getting unexpected behaviors. If it's a matter of reducing amount of code, you can likely refactor your test code to contain e.g. a factory method for setting up classes used in the test.
  • Isolated / independent, i.e. each test has to be able to run separately
  • Deterministic, not depending on external factors
  • Don't use magic numbers, except e.g. "42", "user" or other values which obviously doesn't have any business meaning. Magic numbers (or strings) tend to "get children", meaning they get copied to other tests, and suddenly your tests are becoming polluted with numbers which you don't know why was originally introduced. Use well-named constants instead

Readable

  • Don't use magic numbers (see above)
  • Don't reuse production code for calculating an expected value. You risk duplicating a bug from production code, plus makes your test harder to read. Put simply, assert on the value "4" instead of "2+2". Also makes another reader of your tests, know what to expect
  • Follow the Arrange/Act/Assert pattern for structuring tests. Don't mix asserts, i.e. only have asserts at the end of your tests

Quotes from the training

During the week, Roy came up with several fun and/or inspiring statements, of which I managed to note the following. Hope they make sense without further explanation:

"All software problems are people problems"

"If you hate it, automate it!"

"Change where you work, or change where you work"

"A problem can be solved, a limitation has to be worked around"

"For each behavior, the world is perfectly designed for that behavior to happen"

And not least I will recommend this TDD training to every developer out there. Roy is a really good speaker and is able to explain the concepts of TDD to the audience, in a clear, concise and inspiring way. I knew writing tests is important and valuable, but this week actually showed me that TDD, done right, simply results in a much nicer, cleaner and higher quality code base. I caught myself having several "wow!" experiences during the week, from the beauty and simplicity of the code we did as part of the exercises.


UIMap Toolbox support for Visual Studio 2013

clock March 21, 2014 22:27 by author rasmus

Have recently got a few requests for Visual Studio 2013 support for my UIMap Toolbox tool. So what is a better way to spend a Friday evening? ;)

The VS2013 version can be found at http://visualstudiogallery.msdn.microsoft.com/b1b65cb6-c5aa-486d-b953-4284c787d5a1, and of course using "Extensions and Updates" inside the Visual Studio IDE:

No new features, just added VS2013 support.

Thanks for still using the tool out there!


Highlights from UCAAT conference on model based testing

clock October 31, 2013 23:35 by author rasmus

Attended the User Conference on Advanced Automated Testing (UCAAT) 2013 in Paris last week, primarily covering model based testing, which was a good opportunity for me to get an overview of the usage of model based testing in different areas/industries as well as in which direction model based testing is moving. This post will cover what I found to be the highlights from this conference, namely:

  • How Spotify uses model based testing to bridge the gab between testers, developers and domain experts
  • Microsoft metrics shows that model based tests can be used to find bugs earlier in the development process cycle
  • Model based testing is quite well used in automotive and telecommunication industries
  • Increasing use of TTCN-3 language to write automated test cases

As it can be seen from the conference program, this conference consisted of a relatively high number of short 20-minutes sessions, which meant that many different areas of model based testing was presented, from Spotify to nuclear and flight safety systems, which meant lots of inputs and inspiration, but also a good social atmosphere at the conference, where you could easily find a speaker and ask into their area. The schedule was probably a little bit too tight (30 mins per session would be better), but my impression is that organizing the sessions this way, resulted in a very dynamic conference, with lots of possibilities for networking.

Improving collaboration using Model Based Testing at Spotify

Kristian and Pang from Spotify had a 90-minutes tutorial on their use of Model Based Testing at Spotify using the open source tool GraphWalker, of which Kristian is one of the authors. In contrast to Spec Explorer where models are described in C#, GraphWalker uses a visual designer for modeling, and from their presentation it seems that the model visualizations produced this way are a lot easier to understand people not used to modeling.

IMG_0729

And this was also one of the major points of the presentation, i.e. that these models can be used to improve collaboration and communication within the Scrum teams, as the models can be understood easily by all Scrum team members, Product Owner and other stakeholders.

IMG_0715 IMG_0716

Another very interesting feature of GraphWalker is the ability to combine models, which Spotify uses to let the individual teams build models, which can the be reused by other teams. One example they mentioned, was a model for login, which the "Login-team" could use for extensible testing, whereas other teams depending on this subsystem, would just use it for testing the most common paths through the login process, before entering their own part of the system.

The rise of TTCN-3?

Perhaps due to the fact that I'm not working full-time as a tester these days, I didn't know about the TTCN-3 language before attending the conference. In short TTCN-3 is a language for writing automated test cases, including what seems to be a significant library of helper methods, which was used to demonstrate how to mock a DNS server for testing a DNS query. The following two slides shows the context of testing with TTCN-3, and what I basically got from the presentation and my following talk with the presenter, is that TTCN-3 is “just another” programming language, although designed with testers in mind, i.e. the libraries and structures are targeting the flow of test cases, rather than production code.

IMG_0697 IMG_0701

I met with the presenter of this tutorial and even though the usage of TTCN-3 seems to be increasing, especially within large companies like Ericsson (who seemed very satisfied using it), I find it hard to understand why we need a new language specifically for testing, also taking into consideration that TTCN-3 isn't particularly human-readable, i.e. accessible to non-technical people. I would rather prefer to make the libraries behind TTCN-3 available for use in other programming languages, but there doesn't seem to be any plans for doing so.

It might make sense to use it in a large organization where you have a critical mass of people writing test scripts, but I personally believe that the automation should be written in the same language as the production code, and TTCN-3 hasn’t changed my mind about this. Using same tools and languages on a project for both production and test code makes it a lot easier to communicate and collaborate between people working in different areas.

Finding bugs early using model based testing at Microsoft

Microsoft gave two very good presentations on use of model based testing for testing Windows Phone, which showed some interesting numbers of bugs found as well as when in the development cycle these were found.

MBT_BugTypes MBT_BugPhases

Although I haven’t collected similar statistics from my usage of model based testing, my experience is also that modeling the system helps you find structural/logical bugs during early development phases.

Model based testing at Unity

I also had the pleasure myself to give a presentation at the conference, on our early findings of using MBT for testing Version Control Integration and simple in-game physics of the Unity 3D game engine. The presentation is available here: UCAAT-ModelBasedTesting3DGameEngine-RasmusSelsmark.pdf and was (of course) done as a simple game inside the Unity editor. At least I got several positive comments on the presentation format :)

Overall it has been a good conference. No superstars on this conference (although the guys from Spotify showed some very interesting usages of models for testing), but again many presentations and lots of opportunities to meet and talk with people about how they are using model based testing in their day-to-day work.


Why Spec Explorer generates new states even though no visible changes

clock October 15, 2013 23:45 by author rasmus

This evening I experienced that Microsoft Spec Explorer for no obvious reason treated two identical states as different states in the explored model. Using the “Compare with selected state” feature of the exploration graph viewer in Spec Explorer, I found that the difference was nested deeply inside a .NET generics class:

Spec Explorer model state diff


The example above is from a model testing the Version Control Integration feature of Unity (which might be covered in a later post). If you are reading this blog, you are probably familiar with a version control system, and the problem with the model above is that the Revert() action (S26->S54) doesn’t bring us back to the previous state S13, but rather creates a new state S54. When diffing the states S13 (before checkout) and S54 (after revert), it is seen that the difference is that System.Collections.Generic.Comparer<Int32> has changed from null to an instance of a GenericComparer class.

In the forum thread at http://social.msdn.microsoft.com/Forums/en-US/2e8e999c-9a81-4bb6-814b-1cab8a6c4d93/limiting-state-space?forum=specexplorer covering “Limiting state space”, Nico (Microsoft employee) writes:

Everything in memory is part of the state. The reason is any change to the object model can have consequences on enabled steps

This is the reason why Spec Explorer treats these states differently. In this case the state change was caused by using the LINQ OrderBy() operator in the Revert() action:

Condition.IsTrue(editorId == ModelState.editorInstances.OrderBy(e => e.id).First().id); // limit state space by only first editor can revert

Solution is either to avoid using OrderBy() and other similar operators. Workaround (could be perceived as a “hack”) is to make sure that the Comparer has been set early in the model, by adding the following line to the Filter method of the model:

new Set<int>().OrderBy(i => i);


Spec Explorer Tutorial (for Visual Studio 2012)

clock September 16, 2013 23:17 by author rasmus

A few months back Microsoft released an update to their Spec Explorer tool for developing model based tests, which can be downloaded from the Visual Studio Gallery page. The new version contains several bugfixes as described on http://msdn.microsoft.com/en-us/library/hh781546.aspx, but first and foremost Visual Studio 2012 is now supported and not least this release shows that Spec Explorer is still being actively developed by Microsoft.

This tutorial/getting started guide covers some of the experiences I’ve got from my use of Spec Explorer for some projects over the last couple of years. Primarily this post will focus on

  • Structuring your model project
  • Building models in C# (rather than cord scripts)
  • Limiting model state space
  • Separating model implementation (adapter) from system under test
  • Validating model state using Checker pattern
  • Building and executing tests from model

This tutorial uses Visual Studio 2012, but should be applicable to Visual Studio 2010 as well.

Downloading the files

The files used for this tutorial are available at https://github.com/rasmusselsmark/StackMBT

Modeling a simple stack

For the tutorial, I’ve chosen to model a stack, with the following actions:

  • Push
  • Pop
  • Clear

Probably a lot simpler than the system your'e usually developing/testing, but nevertheless a stack serves as a good example of getting introduced to Spec Explorer, and actually does show some of the challenges related to modeling a software system. And one of my most primary rules when modeling a system is to start simple, which certainly holds true for a stack.

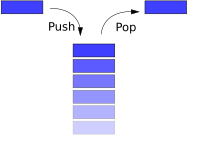
In short a stack is a data type, that only allows to access data at the “top“, e.g. like a pile of books where you are only allowed to take the top-most book.
http://upload.wikimedia.org/wikipedia/commons/thumb/2/29/Data_stack.svg/200px-Data_stack.svg.png

Image from http://en.wikipedia.org/wiki/Stack_(abstract_data_type)

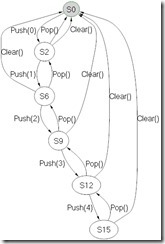
A typical use for the stack in software is the Undo feature, known from almost any program where the user can type in data. The model built during this tutorial will look like this, limited to max 5 elements in the stack.
StackModel

Create new Spec Explorer project

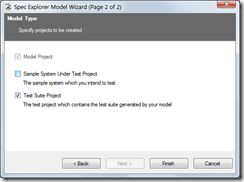
Create a new Spec Explorer project in Visual Studio, by selecting File->New->Project… Select default values, except disable “Sample System Under Test Project” on last page of the project wizard:
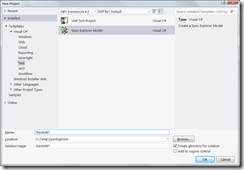
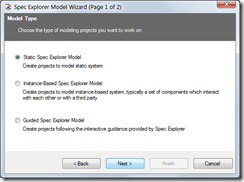
1_CreateProject2_CreateProject3_CreateProject

Structure of modeling solution

For this tutorial (and my modeling projects in general), I use the following project structure. Compared to default naming, you should change “StackMBT” (or whichever name you chose for the solution) to “StackMBT.Models” and also update Default namespace for project as well.

Your solution structure should look like the following:
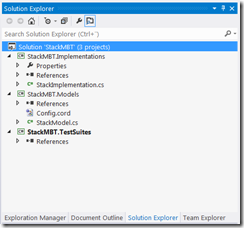
4_Solution

Building the model

In this tutorial, I’m using only C# to define the model, i.e. define actions and transitions. It’s also possible to define transitions using the cord scripting language, but I find that using C# is better for the following reasons:

  • Easier to understand for people not used to using Spec Explorer
  • Possible to unit test your models (will come back to this later in a later blog post)

The Cord script

Update the Config.cord file in StackMBT.Models project to contain the following code:

// A simple stack model using C# model definitions

config Main
{
    // Use all actions from implementation (adapter) class
    action all StackMBT.Implementations.StackImplementation;

    switch StepBound = none;
    switch PathDepthBound = none;
    switch StateBound = 250;

    switch TestClassBase = "vs";
    switch GeneratedTestPath = "..\\StackMBT.TestSuites";
    switch GeneratedTestNamespace = "StackMBT.TestSuites";
    switch TestEnabled = false;
    switch ForExploration = false;
}

// Model for simulating simple stack operations
machine StackModel() : Main where ForExploration = true
{
    construct model program from Main
    where scope = "StackMBT.Models.StackModel"
}

Without going into details on Cord scripts here (see http://msdn.microsoft.com/en-us/library/ee620419.aspx for the MSDN pages on Cord), the two most important elements in the above Cord script are “action all StackMBT.Implementations.StackImplementation;” which says that we should use all actions defined in the C# class StackMBT.Implementations.StackImplementation and the “machine StackModel()” section defines which C# class is used for building the model.

C# model class and state data structure

Add a class with filename StackModel.cs to the StackMBT.Models project. This class will contain the logic for building the model, namely the actions which each describes the conditions required for this action to execute, i.e. for which states the action is applicable.

First, make sure you have

using Microsoft.Modeling;

as part of using statements for the class, as this namespace contains the classes used for describing the model, most importantly the Condition class and the data structures like Sequence<>, which we will use in this tutorial to model a stack.

First of all let’s define the class using

namespace StackMBT.Models
{
    public static class StackModel
    {

Note that the Spec Explorer framework requires you to declare the model class as static. This design choice in Spec Explorer is quite unfortunate I would say, as it makes it e.g. harder to extend models, but in a later blog post, I’ll get back to how we can extend models even with static classes.

Normally you don’t need to declare the model class as public, but I’m doing it in order to be able to unit test the model, i.e. writing tests to verify behavior of the model actions. Writing unit tests for your model class will be covered in a later blog post.

Our model needs to keep track of it’s internal state, for which I implement a specific class (actually a struct). Although the state for this model is quite simple, and we simply could have the stack represented directly in the model class, there are a number of advances related to having it separate, mostly related to reusing state in unit tests as well as implementation (adapter) class.

The StackModelState is declared as follows in the StackMBT.Implementation project (since we’re going to reuse it from our adapter and tests later on):

public struct StackModelState
{
    public Sequence<int> Stack;

    public override string ToString()
    {
        // …
    }
}

Two important things in relation to the state data structure are:

  • StackModelState is implemented as a struct
  • Microsoft.Modeling.Sequence<> is used for representing stack, rather than using the built-in System.Collections.Generic.Stack<> class

When exploring outcome for a model, Spec Explorer needs to determine which states in the model are equal (otherwise the exploration would generate a tree). Based on the page Using Structs, CompoundValues, and Classes on MSDN I’ve found it easiest to use immutable collections as well as structs for representing model state. Spec Explorer provides the following immutable set/collections, which can be used when developing models:

Spec Explorer set Description Corresponding .NET class
Microsoft.Modeling.Map<> Unordered collection mapping keys to elements System.Collections.Generic.Dictionary<>
Microsoft.Modeling.Sequence<> Ordered collection of elements System.Collections.Generic.List<>
Microsoft.Modeling.Set<> Unordered collection of elements without repetitions Probably a custom implementation of List<> gets closest


In the model class, we instantiate the model state in the following field:

// Model state
public static StackModelState ModelState = new StackModelState() {Stack = new Sequence<int>()};

Unfortunately a downside here is that we have to remember to initialize the internal state fields as well, as we cannot rely on a constructor for our struct.

Now that we have the model state declared, we’re ready to move on to defining an action, for which Pop() is the simplest, as it simply has to throw away the first element on the stack (we don’t care about the value of the element right now).

[Rule]
public static void Pop()
{
    Condition.IsTrue(ModelState.Stack.Count > 0);
    ModelState.Stack = ModelState.Stack.RemoveAt(0);
}

Note the Rule attribute applied to the method, which tells Spec Explorer that this is an action/transition. The condition says that we can only pop elements from the stack, if it’s non-empty. Since the Sequence<> type used for representing the stack is immutable, we need to assign it to the stack in the second line of the Pop() method above. If we didn’t assign it, the state simply wouldn’t change.

Now we can also implement the two remaining actions:

[Rule]
public static void Push([Domain("PushValue")] int x)
{
    ModelState.Stack = ModelState.Stack.Insert(0, x);
}

[Rule]
public static void Clear()
{
    Condition.IsTrue(ModelState.Stack.Count > 0);

    while (ModelState.Stack.Count > 0)
    {
        ModelState.Stack = ModelState.Stack.RemoveAt(0);
    }
}

For the Push() action we have declared a parameter, which defines which value is pushed onto the stack. By using a the Domain attribute here, we can declare a method which defines possible values for the argument:

public static IEnumerable<int> PushValue()
{
    return new int[] { ModelState.Stack.Count };   
}

This simply means that we will push the numbers [0,1,2,3,…] onto the stack in that order. If returning a set of multiple numbers, Spec Explorer could pick any one of this numbers during exploration of the model.

Limiting state space

In the actions above, only Pop and Clear methods have set a condition, that these actions should only execute when the stack is non-empty, otherwise these operations aren't applicable. We need to set an "upper limit" as well for in order to control the resulting modeling space when exploring the model. This can be achieved by implementing a method decorated with the StateFilter attribute, which tells spec explorer that this method is used to "filter" the model.

[StateFilter]
static bool Filter()
{
    return (ModelState.Stack.Count <= 5);
}

This will stop exploration of the model, when we reach 5 elements in the stack.

Connecting the model to our system under test using implementation class (adapter)

Before we are able to actually able to visualize/explore our model, we need to implement the adapter, as shown in the following figure taken from http://blogs.msdn.com/b/specexplorer/archive/2009/11/23/connecting-your-tests-to-an-implementation.aspx:
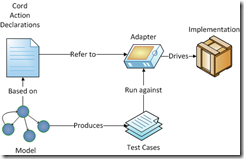
image_4

In the Config.cord file we specified that actions are defined in the class StackMBT.Implementations.StackImplementation:

action all StackMBT.Implementations.StackImplementation;

The full content of this file is as follows:

using System;
using System.Collections.Generic;
using System.Text;

namespace StackMBT.Implementations
{
    public static class StackImplementation
    {
        // Our "System under test" stack
        private static Stack<int> stack = new Stack<int>();

        public static void Push(int x)
        {
            stack.Push(x);
        }

        public static void Pop()
        {
            stack.Pop();
        }

        public static void Clear()
        {
            stack.Clear();
        }
    }
}

In this case we’re actually using the System.Collections.Generic.Stack<> class, as this is the system under test for our model.

Visualizing the model

We have now implemented all necessary parts in order to visualize/explore the model. Open the “Exploration Manager” tab (or select Spec Explorer->Exploration Manager menu), right click and select "Explore":

ExploreModel_1

This should produce the following visualization of our model space:
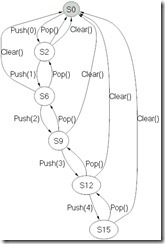
StackModel

By exploring the model using Spec Explorer, we can visually verify that we have modeled the SUT correctly, i.e. not having invalid transitions in the model. For this simple model, it’s easy to verify, but models can quickly become too big to be verified visually. In these cases it’s important to start simple, and verify that the basic model is as expected, before adding new actions.

When clicking on the states in the model/graph, you can use the State Browser window to verify that the model state is as expected when navigating through the model.

image

In the above example, I have selected the S9 state in the model, for which the stack should contain the elements [2,1,0]

Comparing model states

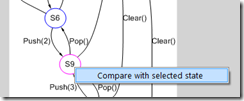
Another powerful feature of Spec Explorer is the ability to visually compare states in the model. Click on e.g. state S6, to select it, and then afterwards right-click on S9 and the select menu item "Compare with selected state":
CompareStates_1

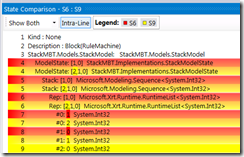
This will then show a visual diff between states S6 and S9.
image

In this case we can see that an extra element #2 has been added to state S9.

Verifying model state using the Checker pattern

Before generating tests based on the model, we need to implement validation of expected model state, by using the State Checker Pattern. This adds an extra action for each state in the model, where we can verify that the state of system under test is as expected from our model, i.e. our stack contains the expected element.

To implement the Checker pattern, add the following rule to StackModel.cs class:

[Rule]
static void Checker(StackModelState state)
{
    Condition.IsTrue(state.Equals(ModelState));
}

as well as the following two metods in StackImplementation.cs:

public static void Checker(StackModelState state)
{
    Assert.AreEqual(state.Stack.Count, stack.Count, "Not same number of elements in stack");

    string expected = ArrayToString(state.Stack.ToArray());
    string actual = ArrayToString(stack.ToArray());

    Assert.AreEqual(expected, actual, "Array elements not equal");
}

private static string ArrayToString<T>(T[] array)
{
    var text = new StringBuilder();
    text.Append("[");

    for (int i = 0; i < array.Length; i++)
    {
        if (i != 0)
            text.Append(",");

        text.Append(array[i].ToString());
    }
    text.Append("]");

    return text.ToString();
}

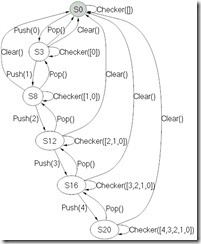
When exploring model now, you should get the following visualization, where we have the new Checker action applied to each state, showing what the expected state of the stack is at the given node in the graph:
StackModelWithChecker

Generate and execute test cases

One of the strengths of modeling tests, is the ability to have the tool, in this case Spec Explorer, generate test cases based on the model. To do this we simply add the following declaration to the Cord.config file:

machine StackTestSuite() : Main where ForExploration = true, TestEnabled = true
{
    construct test cases
    where strategy = "ShortTests"
    for StackModel()
}

What’s important here is “TestEnabled = true”, which tells SpecExplorer that this machine allows tests to be generated from it using the “ShortTests” strategy for generating tests. Either “ShortTests” or “LongTests” strategies are possible as described on http://msdn.microsoft.com/en-us/library/ee620427.aspx.

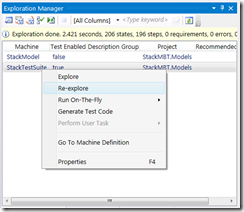
In the Exploration Manager window, the new machine “StackTestSuite” is now available.
ExploreModel_2

Click “Explore” to see the test cases that Spec Explorer will generate for our model:

TestCasesVisualization

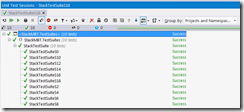
Finally generate the actual C# tests, by choosing “Generate Test Code” in Exploration Manager, which can then be executed as any regular test from Visual Studio (here using ReSharper):
image

By writing relatively little code, we were able to generate a model and 10 test-cases for our system, which is one of the strengths of model based testing. Also, if implementing a new action in the model, it's easy to generate new test-cases using the tool, without having to edit each test case.

This completes this Spec Explorer tutorial. In later posts I will follow up with some more practical examples of using Spec Explorer and model based testing for various parts of the Unity 3D game engine.

EDIT: As I've moved to a developer role within Unity, I unfortunately haven't had time to follow up on with the promised additional posts. My plan is still to use model based testing for testing the features we're working on (mostly back-end).


Unite Nordic – Malmø May 2013

clock May 24, 2013 08:33 by author rasmus

As I'm now working for Unity Technologies attending one of our annual Unite conferences was a good opportunity for me to meet some of our users (i.e. game developers) as well as watching some sessions on how Unity is being used for developing games in the community.

Keynote and Unity highlights for 2013

Although I only had time to participate in the second day of the conference, I would like to mention that the Keynote from Day 1 of the conference is available at http://www.youtube.com/watch?v=QY-e2vdPdqE. If you're a Unity user, you have probably already heard that building iOS, Android, Blackberry and Windows Store games is now free, which I'm sure will "democratize game development" even further, and increase our user base to more than the current 1.8 million developers mentioned in the keynote. Approx. 15:30 into the video the highlights for Unity in 2013 is being described, which are:

  • Increased quality
  • Faster releases
  • More platforms

Working in our QA team, it's of course interesting to see quality being mentioned explicitly, but the other two bullets on faster releases and support for additional platforms (e.g. new consoles) also has a strong dependency on a working automation infrastructure. Automation is the key to being able to release faster as well as scaling out to new platforms, without risking to break the existing. The good news here is that I feel confident that we have the necessary automation in place at Unity, and I'm looking forward to see how this will evolve even further. A later blog post will contain some more in-depth technical information on our automation approaches.

Procedurally generating content in your Unity games

In this session two guys from the UK game studio Big Robot presented their game "Sir, you are being hunted" which in short is a first-person-shooter where you have time travelled to UK in a time where only robots exists, and your goal is to collect the necessary pieces to assemble the time-machine so you can get back, without being killed by one of the many robots that will do whatever they can to kill you. Both liked the graphics and gameplay.

IMG_0440

Based on their game, the point of this talk was to show their approach to procedurally generating the game, i.e. not using the built-in scene designer of Unity, but rather generate the scenes (for this game being islands) at run-time. From a software development point of view, it was interesting to see how  they used graph theory for building up the landscapes, e.g. first placing the villages on the island, then connecting them with roads after which the houses was then placed along the roads.

IMG_0441 IMG_0443

Next I also found it interesting to see how they perceived the game as a state machine (unfortunately didn’t get a good picture of that slide), which to me confirms that game development is like any other software development project, with same techniques and practices being applicable. Although I must admit the appearance is much nicer compared to the business application software I've previously worked with Smile

Some of the benefits by generating your game content procedurally, was:

  • Unique game experience, since every game is different from the others
  • By allowing user/player to modify parameters like e.g. number of villages, they can themselves customize the game. Fewer villages would in this case make the game harder, as there is fewer places to get e.g. weapons and food
  • Gets a more dynamic game flow
  • Easier to exclude elements, e.g. specific types of buildings or characters, if testing or user feedback indicates they doesn’t provide the expected game experience


And last but not least, it was of course good to hear them say “we wouldn't never have been able to develop a prototype for this game in such a short time without using Unity”

"Don't let the kids know they are learning"

Another session I attended was a presentation of an educational game Machineers. The game itself seems at first glance to be an advanced puzzle game, letting the player solve various logical challenges by assembling mechanical items, like motors, belts etc. to assemble machines. I'm not sure I will just accept the premise that this is "kids programming", but nevertheless the game looked fun and served an educational purpose in teaching the kids how to solve logical problems.

As always, this presentation included some more general concepts, like "game flow theory" (see e.g. http://en.wikipedia.org/wiki/Flow_(psychology)) which, on a probably very basic level, describes the gameplay progression as the player becomes more experienced/skilled in the game. The player should stay within the "flow channel", otherwise he or she will either give up or simply get bored, which in both cases most likely means quit playing the game.

IMG_0467

Another off-topic subject touched in this talk was how to make kids learn while having fun. I apologize the bad quality of this picture, but the point here is that your educational game should look like a real game. If in doubt, the educational game is on the left…

IMG_0464

A note here was to design the graphics of your educational game to target kids a few years older than your expected audience, as kids prefers to "aim higher" and certainly don't want to play a game which looks like it’s designed for a younger age group. And the kids should not be aware they are learning, while playing the game, which as a side-note is an interesting point in the currently ongoing Debate in Denmark on extending the school day in the elementary school, where I think it's important that we're not simply extending the current practices, but use the additional hours to explore new ways of teaching and learning (if the Danish parliament actually reaches an agreement on this).

My general impression of this Unite conference, is that it's like most other conferences I've been to, with a mix of domain specific (gaming, in this case) and technical talks. As said earlier, my impression is still that developing a game engine and games is like any other software development, and this conference didn't change my view on this. If you're a Unity user, this is, along with all our other communication channels, a good opportunity to meet other Unity users as well as talk directly with Unity employees.


A high level view on test automation architecture

clock April 15, 2013 22:47 by author rasmus

As I often find myself drawing this overview of a test automation architecture, I’ve finally decided to write a short blog post about it. The architecture itself isn’t either new or very innovative, but nevertheless I find that it still is very useful, and provides a baseline for more recent implementations of test automation, like e.g. SpecFlow or similar technologies.

The purpose of having an architecture for your test automation code is to:

  • Ensure good development practices is used in automation code (remember, your automation code must have same quality as production code)
  • Increase maintainability of test automation code

The architecture diagram is shown below, with a traditional architecture for production code shown on the right (I'll get back to the purpose of this).

image

Test Cases

  • Implementation of e.g. test cases or other
  • This layer should be implemented using declarative programming style, meaning what should be accomplished and not how it’s actual done. I.e. should not include references to actual implementation of system under test, e.g. UI buttons or other more low-level ways of accessing the system

Test Actions

  • Contains all the “building blocks” used in the actual tests.
  • Also somewhat declarative, depending on system and complexity.

Test Infrastructure

  • Imperative (i.e. the actual implementation / "how")
  • The actual ways the system under test is accessed
  • Type-safe representation of UI, e.g. using Microsoft CodedUI UIMaps or similar methods
  • Protocols, e.g. HTTP or other low-level ways of accessing the system
  • Whenever possible, auto-generate code in this layer, e.g. if it’s possible to generate the UIMaps as part of your build process, so you don’t have to maintain these manually.
  • Depending on system, the infrastructure layer exposes either the actual implementations (e.g. UIMaps) or wrapped interfaces, e.g. if there is a need to change actual 3rd party technologies used.

System Under Test

  • No code goes into this layer, but is included in order to show what it is we’re testing (and I find it similar to the database layer in the right hand side of the diagram)

The right hand side of the diagram is included to show test automation code compares to any other traditional software architecture, again in order to emphasize that automation code should be treated as any other code in your system, by using same software development practices that is used for the production code. Another point though is that we should be aware of the added amount of code for automation capabilities. In a typical setup we can easily double the number of layers (e.g. adding 3 layers of automation code on top of 3 layers of production code). The point is of course not to avoid automation, but to have the right level of automation by accessing lower levels of the system whenever possible. And also see if you can auto-generate any of the test automation code like UIMaps or other interfaces for accessing the system under test. If possible generate this as part of your build process.


Microsoft Debug Diagnostic Tool to the rescue!

clock February 28, 2013 00:04 by author rasmus

While testing software, it now and then happens that the system you’re testing simply crashes, without leaving any useful information about what and why. In these cases I’ve found the Debug Diagnostic Tool from Microsoft very useful, as this can provide you with detailed information which can help to locate the bug.

Steps to install tool on your test environment:

1. Download from http://www.microsoft.com/en-us/download/details.aspx?id=26798

2. Configure what kind of crashes to detect (in this case the explorer.exe process):

image

image

image

image


3. Open Tools->Options and Settings… and add your symbols path (in this case I’ve just copied them into “C:\Symbols”):

image

A note here: Make sure you have the same configuration (release/debug) and bitness (32/64 bit) as the binary you want to get stack trace for. Otherwise you won’t get the full details.


4. Trigger the crash and analyze the data to generate a report. In this you will have a stack trace like e.g.

image

as well as line numbers (if you have symbols loaded) to the right:

image


Use this tool whenever you experience a crash in your Windows binaries, for which you cannot get other useful information.


Warm Crocodile Conference - Wednesday

clock January 17, 2013 00:50 by author rasmus

I have the pleasure of participating at the Warm Crocodile Conference held by Microsoft in Copenhagen these days along with a couple of colleagues from ScanJour A/S. First thing to mention from this conference is that the venue is rather unusual, namely being held in an “apartment hotel”, which means that the sessions are taking place in big apartments, and in one of the sessions I participated in today, approx. half of the audience had to stand. I might becoming old, but I certainly prefer a good old-fashioned auditorium with nice soft seats Smile

IMG_0135

Enough of that, but let’s focus on the presentations, which so far has been good. The subject of the keynote by Roy Osherove this morning was “Ravine”, i.e. the progress of learning, as illustrated by the following slide.


Keynote: Ravines of learning

The talk both had a professional as well as a personal view, i.e. how we professionally develop our skills as well as how having a child also results in a need for acquiring new skills on a personal level.

IMG_0079

The slide above shows the situation where we experience a decrease in productivity e.g. when having to learn new skills or technologies, but after a while the net effect should be an increase in productivity. But an important point here is also that you need to get out of your “comfort-zone” now and then, in order to increase your personal knowledge and productivity. If you stay working on your regular tasks, you will not improve.

Then he talked about “survival mode” (or “fire-fighting” is how I usually name this state) where you/the team are rushing behind tasks, and often or always have to cut corners, typically on quality, in order to meet the deadlines. I apologize the bad quality of the left picture, but I was standing in the back of the room (again, it was surprisingly primitive conditions at the conference, but the content of the talk was good)

image image

You need to be aware when you are in “survival mode” and try to get out of it. Especially if your are lead for a team, you must get the team out of the survival mode as fast as possible, if you identify it has happened. The right slide says that there is always a reason/root cause for a behavior, i.e. nothing simply happens by accident, when you investigate the issue further.

Last part of the talk was about changing behavior, which consists of the following three aspects:

  • Personal
  • Social
  • Environmental

Changing behavior on a personal level might be by having regular 1-1 talks, reviews, followups etc. with the person. On the social level it can be to gather a group of people to watch videos or otherwise introduce new ideas into the group and finally the environmental aspect can be e.g. changing bonus/rewards that’s not encouraging the desired behavior.


A different view on layered architecture by Ayende Rahien

Next I went to the talk by Ayende, author of/involved in e.g. NHibernate and RavenDB, on layered architecture and especially on reducing the number of layers when possible. The purpose of introducing layers in your software system is normally to abstract lower parts of the system, and thereby easing the use of those levels and generally make the overall system more maintainable. I’ve seen (and unfortunately also written myself) layers that rather just introduces additional overhead/deadweight to the system, e.g. simple database calls etc.

The talk started out with a historical tour of software development back from end of the 1970ies where computers was mainly standalone systems with limited need for any layers. But as e.g. networks prevailed, a need for abstracting e.g. data access and business logic layers was introduced. The point of the talk was that we should not blindly implement layers and abstractions, just because we can, but ensure that any layer is actually providing a sound abstraction and overall value to the system.

The left slide below shows actual code from Ayendes blog (based on RavenDB), where instead of having a dedicated repository for getting the blog posts, he simply queries them using LINQ, since there is almost none logic involved expect the call to WhereIsPublicPost() extension method. The right slide gives examples of abstractions, with a note to limit the number.

IMG_0097 IMG_0099

Then the talk went on to unit testing vs. integration/functional testing, where Ayende was advocating for focusing on testing the full system, instead of focusing on unit tests which might just “test the abstraction”. E.g. by using an in-memory database, you can still run your integration tests fast and isolated. As I’m primarily working with test, I certainly see the point of focusing on testing the full system. After all our goal is to have a working system, not just passing unit tests. Nevertheless unit tests does “raise the bar” of what needs to be either tested by integration tests or even manually, but we should of course make sure that the unit tests are actually providing value.

IMG_0103 IMG_0102


Introduction to Twitter, Facebook and LinkedIn APIs using OAuth

Anne-Sofie Nielsen gave a “Tour de API” of how to access Twitter, Facebook and LinkedIn using OAuth. Unfortunately the light in that room wasn’t good for taking pictures, but her presentation can be found at http://prezi.com/fcyng34ox56t/tour-de-api/. It was an interesting introduction into integrating with social networks, and it’s not unlikely that our case and document management system in some situations can use this.


NuGet

After lunch, I went to the first of two talks on NuGet today held by the same speaker. As I see it, we actually started out with the “advanced” session first and closing the day off with the more introductory talk at the end of the day. Nevertheless the two talks in combination has given me valuable input on how to start using NuGet for helping managing dependencies between our internal automation frameworks. In his first talk he had a number of “advices”, from which I found the following most relevant. Especially the slide on version number schema, which has given me some challenges, as our binaries build by Team Foundation Server has the 3-dots format.

IMG_0109 IMG_0110 IMG_0114

Breaking the chronological order here, but as we’re on the subject, I’ll move right on the introduction session on NuGet. From this I found the following three slides informative, describing symptoms of problems in your overall build infrastructure and the term “dependency hell”, which by no mean is new to me.

IMG_0164 IMG_0165 IMG_0166

I even found this MSDN article from 2001 (!) describing the “DLL Hell” as we used to call it back then in the COM days. .NET has reduced much of the pain related to this, but there is certainly room for a tool like NuGet to help manage these dependencies.


Unit Testing Good Practices & Horrible Mistakes

Roy, who gave the keynote this morning, also had two sessions on unit testing, where I participated in the last one on best practices (apparently along with half of all conference participants, as most of us had to stand up – this explains the bad image quality on some of the pictures – you get tired in your arms after standing up for longer time Smile)

Good unit tests (and automated tests in general, I would say) should be trustworthy, i.e. doesn’t fail periodically, be maintainable and readable. As the right-most slide shows, this is linked together in the sense that tests not being easily readable are harder to maintain and therefore also likely not to be trusted in longer run.

IMG_0123 IMG_0126 IMG_0127

Characteristics of unit tests is that they

  • Has fast execution time
  • Executes in-memory
  • Has full control over the “test context”, e.g. input values
  • Fake dependencies

If a test does not comply with this, then it’s an integration test (and he mentioned several times that unit and integration tests should be placed in different projects, again to help maintainability)

Some other very valuable points from his talk was:

  • Have a naming convention for your tests. His suggestion is [UnitOfWork_StateUnderTest_ExpectedBehavior] which he has also described at http://osherove.com/blog/2005/4/3/naming-standards-for-unit-tests.html
  • Avoid multiple asserts against different objects in a test. The problem is that if the first assert fails, you will never know if the other object(s) failed or passed their tests. Instead this should be separated into different tests
  • Don’t fake database tests, but perform these as integration tests instead running against the database
  • Max one fake/mock object per test, and preferably avoid using fakes in a test, as this gives internal dependencies on your actual implementation, which might reduce maintainability of both test and production code

Roy has written the book The Art of Unit Testing, which most likely contains all the above advices plus a lot more.


Implemeting loosely coupled software systems using Rebus

This talk was by the author of Rebus who gave a live presentation of implementing a messaging based system based on this free open-source message queue/bus, that can handle exchanging messages between different components in a software system.

IMG_0136 IMG_0138 IMG_0142

With help from some pre-prepared code and code-snippets we almost ended up with an implementation of the following system within the one hour presentation, which also contains the mechanics for handling messages that times out.

IMG_0158

Message queuing is certainly not a new technology, but Rebus seems at first sight to be a very useful implementation that can be used to help componentize/modularize a system (rather than developing a big monolithic system).


Despite the rather unusual venue place, it has been a good first conference day with nothing but interesting and motivating speakers and topics.

And not least I won a free copy of the “Pro NuGet” book written by the speaker of the two NuGet session. I’m very much looking forward to reading this book Smile


About the author

Team lead at Unity Technologies. Focus on automating any task possible. Author of e.g. http://uimaptoolbox.codeplex.com

Twitter: @RasmusSelsmark

Month List

Sign In